There are a few tutorials demonstrating how to set up an SSL connection with a website hosted on GitHub pages This One by Sheharyar Naseer and This Other One by Keanu Lee. While they were helpful they focused on custom website tools such as Octopress and Jekyll. This guide is aimed at purely static HTML, CSS, JS and a domain managed by Google Domains.
So why go through all this work?
Well first off it’s cheap, about as cheap as it comes for solid web hosting, custom domain, and SSL certificate. Really, the only thing you have to spend money on is the custom domain name. Hosting on GitHub with GitHub Pages is free and using a Flexible SSL from CloudFlare is also free. All you’re paying for is your domain name, so from $12 a year you get the big names of Google, Github, (and CloudFlare) behind you.
Secondly, you then get all the benefits that SSL has to offer. Those mainly being an added layer of security for your site and peace-of-mind for your customers. And possibly more important https now affects search engine rankings (at least from Google).
This guide takes into account that you have already purchased a custom domain name from Google, if not you should do that prior to anything else. This guide is aimed specifically at using Google Domains, so if your domain name is hosted elsewhere some of these steps may not be applicable to you but hopefully you should be able to sub your domain name hosting in with relative ease.
Step 1: CloudFlare
- If you don’t already have an account for CloudFlare go sign-up for one; it’s free.
- Add your site. This should be a site you want to add the SSL to.
- Note: The records that are automatically generated by CloudFlare should match your Google Domains records.
- Copy down the two DNS name servers that CloudFlare assigns to you.
- These name servers should look something like name.ns.cloudflare.com
Step 2: Google Domains
- Log into your Google Domain account and select the site you’re working with.
- On the DNS settings page you should see a Name Servers section; then click the “Use custom name servers” radio button and enter the two CloudFlare name servers

- Copy the Custom Resource Records from Google DNS settings
Note: if you are using other Google Apps (for business) like Mail, Doc, Drive etc you will also need to copy those records. Note: I only needed to transfer the MX (mail) records but your results may vary.
#Step 3: Back to CloudFlare
- Go to your DNS settings in CloudFlare and enter all of your DNS records from Google. Also, you need to create a CNAME record that points to username.github.io
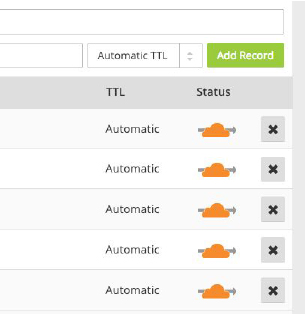
- On the DNS settings page, you need to turn on CloudFlare for all the records.
- The icon, when off, looks like a gray little cloud, when turned on it is bright orange. (If you forget to do this SSL will not work and you will get an error on page load.)

- Finally, go to your sites ClouldFlare settings and turn on SSL setting it to Flexible SSL.
Step 4. Github
- Head over to GitHub and create a new repository named username.github.io, where username is your username (or organization name) on GitHub.
- If the first part of the repository doesn’t exactly match your username, it won’t work, so make sure to get it right.
- Push, Clone, Migrate your site into the newly created repository.
- At this point if you hadn’t done all the DNS mapping above your site would display at username.github.io. Now, it should redirect to your custom url.
- Finally, create a file called CNAME in the site’s repository and put your custom url on the first line. my-custom-name.com
- If you configure both an apex domain (e.g. example.com) and a matching www subdomain (e.g. www.example.com), GitHub's servers will automatically create redirects between the two.
- For example: If your CNAME file contains example.com, the www.example.com will redirect to example.com.If your CNAME file contains www.example.com, then example.com will redirect to www.example.com.
Step 5: Forcing SSL Connection
- Add this code to each page you want secured, at the very top of the <head>.
- <script type="text/javascript">
var host = "yoursite.com";
if ((host == window.location.host) && (window.location.protocol != "https:"))
window.location.protocol = "https";
</script> - You should make sure all links now point to the https:// version of your site.
Hopefully, this worked for you! If you did this all in one go you should note that DNS records can take up to 72hrs to propagate across the web.
You should also be aware the Flexible version of SSL that CloudFlare isn’t as secure as Full SSL and as such should never be used to transfer sensitive data. The flexible SSL protects against unsecured networks and in general, will cause the rest of the web to treat your site as secure.


